Alcohol Etching
This "alcohol etching" technique was created
while working on a card challenge. It's extremely simple to do, and couple of
practice sessions will make you a pro!!
Supplies:
Solid stamp
Staz-On black or brown solvent ink
acetate (transparency)
double-sided removeable tape (optional)
ethyl rubbing alcohol (just pour a small amount into the lid)
smallest make-up sponge you can find (I actually ended up using SU's chalk
sponge applicator, and now this sponge applicator is dedicated for this
technique because it does get stained with Staz-On)
Note - those with sensitive noses may want to have a fan blowing because of the
use of ethyl rubbing alcohol that is used for this technique.
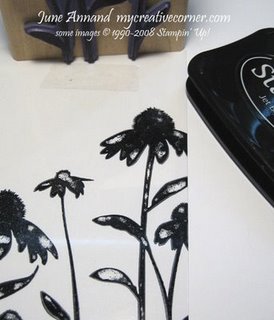
1) Using the repositionable double-sided tape, adhere your transparency sheet
onto your scratch paper. Stamp your solid stamp image in Staz-On ink onto your
transparency. Don't worry about any areas with ink that doesn't transfer. Give
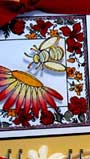
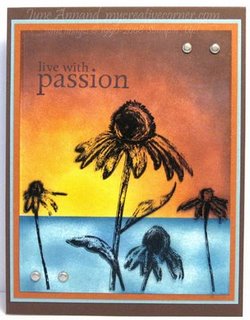
it a few seconds to dry. Here I used the coneflower from Inspired By Nature
stamp set.
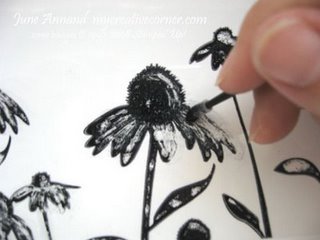
2) Dip your tiny tipped sponge applicator into the alcohol and begin rubbing
areas of ink that you want to remove. You know, maybe even one of those flat
toothpicks would work for this... I say this because I ended up trimming the
very tip of the sponge off the applicator and used the plastic tongue that was
inside to scrape the alcohol-moistened areas on some parts of the coneflower....
so I used the spongy part to remove ink from larger areas and the plastic to
scrape and create lines. Notice that little grey shading directly under my
fingers? That's from the little bit of alcohol dissolving/removing Staz-On from
that area of the image .
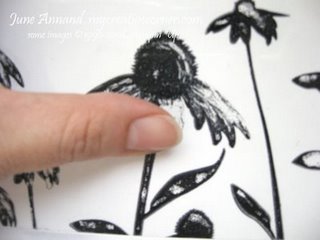
3) When you've finished removing the ink that you want, simply rub the entire
area with your finger to "erase" all the grey shadings (although, you may want
to keep it as shadows seem really popular right now). I tried a napkin too, but
it seemed to me that the area cleaned up easier with my finger. Maybe that
little bit of oil on your fingertips does the trick? Anyhow, once you're done
cleaning up the area on the transparency, wash your hands so you don't transfer
black smudges onto your cardstock or paper while you finish up your project...
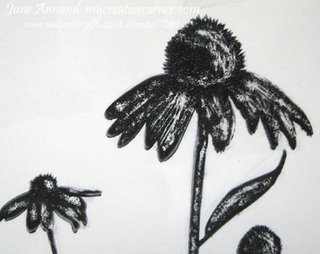
And, there you have it - your alcohol etched image!
For the rest of the card details –
Stamps: Inspired by Nature
Cardstock: Baja Breeze, Chocolate Chip, Really Rust, Whisper White
Inks: Baja Breeze, Summer Sun, More Mustard, Really Rust, Chocolate Chip, black,
Staz-On black, and a very small touch of Pacific Point for the horizon
Accessories: acetate (transparency), double-sided tape, ethyl alcohol, tiny SU
chalk sponge applicator, sponge daubers, silver brads, long post-it for horizon,
1/16 hole punch for the brads
The background was created by using a post-it and sponging my sunrise and ocean
onto Whisper White cardstock. I stamped the sentiment in the upper left corner
and added the finished transparency. Finally, brads were inserted and this was
layered a couple times before adhering to the card base. |
|
|
 |